Setting up your Raspberry PI3 with PI-Star
Here is a simple guide to help you set up the PI-Star Image on to your Raspberry PI3.

Note that this setup is for the DVMega, although it mainly focus's on installing the PI-Star image on to your Raspberry PI3.
After receiving your Raspberry PI3 and DVmega, fit the DVmega to the Raspberry PI3.
Now... you need a high quality, high speeds Mirco SD Card, I recommend a know brand SD Card. At least an 8 Gig Card.. although the PI-Star Image will only use around 2 Gig. I used a 16 Gig SD Card.
You need to make sure your card is formatted to say Fat32, I suggest you download and install and run. SD Formatter. Download From Here.

Install the software on your PC and run the program, insert your Micro SD in to the PC, and Format the SD Card to Fat32.
You can leave the SD Card in your PC for the moment, now that you have formatted the SD Card it is ready for the next step.
Download the latest version of the PI-Star Image. from here.

Make sure you download the correct image for your Raspberry PI..
Example (Pi-Star_RPi_V3.4.5_29-Sep-2017.zip )
The file will be Zipped so you will need to in Zip the File and place it in a folder remembering where it is... say your desk top.
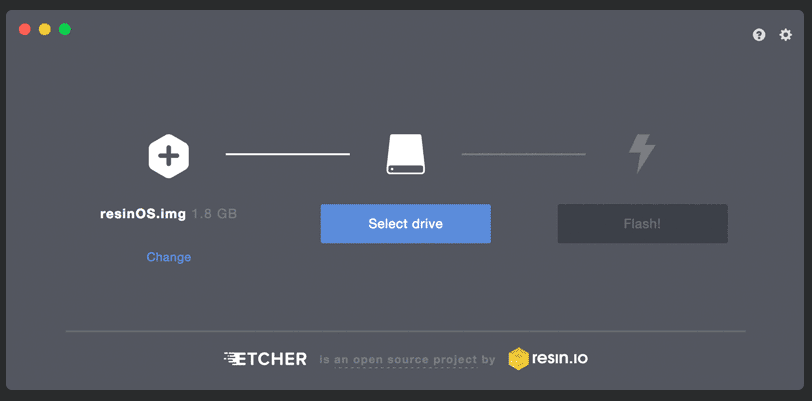
Now you need to Flash the Image file that your just in-zipped to the CD Card.. I used a program called Etcher.. You can download it from Here.
Once Etcher is installed, run the program.. Simply follow the prompts, Selecting the image, then the SD Card, and away you go.. Etcher will install the Image in to the SD Card and make it bootable.. This can take some time, depending on the speed of your card and PC.
I would recommend one more step if you would like your Raspberry PI to boot up and automatically connect to your Wifi Network.. I found this very useful and worked well.
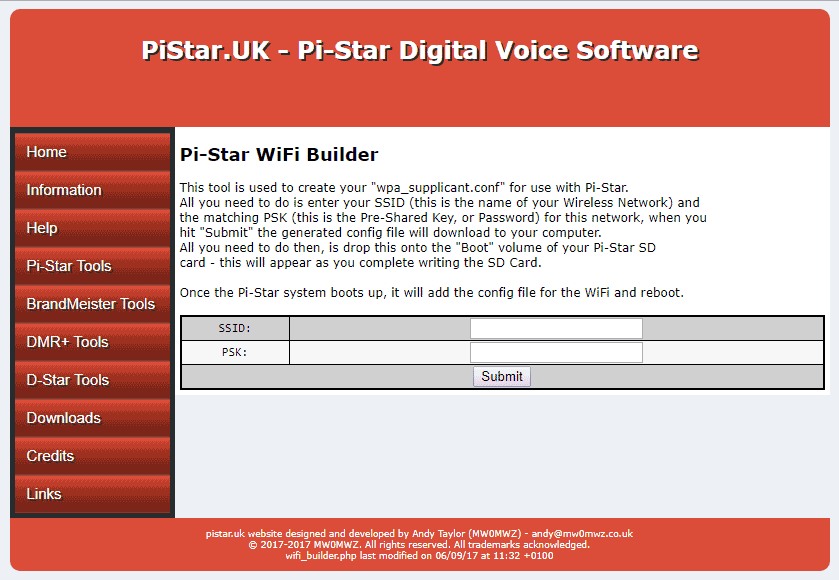
Using this link on the PI-Star Web site.. Click Here... This will create a file which you then copy to the SD Card.. Simply follow the steps on that page..
Once completed...remove the SD Card.. Note: I would suggest either shutting down your PC, or using the "Safely Remove Hardware and Eject Media" option.. as this will help eliminate and faults on the SD Card.
So now your SD Card has the bootable PI-Star image ready to go...
Install the Mirco SD Card into the slot on the Raspberry PI.. Power up the Raspberry PI.. Now remember that I am using the DVMega board attached to the Raspberry PI board..
Give the Raspberry PI around 2 mins. to boot up.. Now if all worked well. the Raspberry PI will connect to your local Wifi..
On your PC, open your Web Browser, and type in to the address bar.. pi-star.local
Hit the enter key.. and .... your Pi-Star Dashboard should appear.
From here... you need to configure your setup...
I would suggest watching these YouTube Clips..

I hope this was of help to you.